A Child Theme is a theme that inherits the functionality and styling of another theme, called the Parent Theme. Child Themes are the recommended way of modifying an existing theme. Therefore, we strongly recommend that you use Child Theme instead of Parent Theme.
There are few good reasons, why we recommend you to use a Child Theme:
You can do advanced customizations with hook & filters, custom CSS, overriding page templates, and other customizations which need coding. The customizations made to your Child Theme would be preserved whenever you update the Parent Theme.
Easier future updates -- you only need to delete the old Parent Theme, and upload the new version of Parent Theme. Your changes on Child Theme would be preserved and work out of the box with the new version.
You can re-brand the Child Theme info into your own, e.g. changing the Child Theme name, slug, and description. It's good if you build the website for your clients.
Sample Child Theme is included
All SingleStroke's themes are packaged with a sample Child Theme. You can directly install the Child Theme along with the Parent Theme, and then activate the Child Theme. No additional setup is required, as our sample Child Theme already contains pre-defined scripts to make it works out of the box with the Parent Theme.
Migrating to Child Theme
If you have been using Parent Theme and at certain point you need to migrate to Child Theme, you can easily activate the Child Theme. All the configurations would remain safe, the only things you need to re-configure is Menus location. Please go to Appearance > Menus and re-assign your menu to the appropriate location.
2. Theme Installation
Before you get started with our themes, please note that all SingleStroke's themes ONLY work for WordPress.org (self-hosted WordPress) and can't be used for WordPress.com installation. If you are new to WordPress.org, please follow these few steps to setup WordPress on your hosting.
1. Get a good WordPress hosting
WordPress.org application needs to be installed on your own hosting. If you don't have any host yet, you can take a look at our Recommended WordPress Hosting list, which has high quality hosting plan to run WordPress.
** We strongly suggest you to use one of our recommended hosting, as some other hostings have issues and aren't completely compatible to run the lastest version of WordPress.
2. Install WordPress on your hosting
After activated your hosting, the easiest way to install WordPress is using the "1 Click Install" feature that might be available on the hosting features. But if you want to take control of the process by yourself, you can use this 5 Minute Install which has detailed instructions to setup your WordPress. We recommend you to do it manually as it's good to make you more familiar with the platform itself.
3. Enter your WordPress site
After installed your fresh WordPress site, you could log into the admin pages, by going to your site URL and add "wp-admin" next to the site URL, e.g. http://domain.com/wp-admin. Use the username and password you just created, and you would be redirected to the Dashboard page.
4. Download the theme package
Simply log into your ThemeForest account you used to initially purchase the theme and navigate to your Downloads page and find the theme in the list. Click "Download" button and choose "All Files & Documentation". Extract the package .zip file and you would find two .zip files: the Parent Theme and Child Theme. The filenames should be in
[theme-name].zip and [theme-name]-child.zip
5. Upload the theme into WordPress
First, log into your new WordPress installation and go to Appearance > Themes, and click "Add New" button on the top part of the page. After that, click "Upload Theme" button and upload the Parent Theme .zip file, [theme-name].zip.
Child Theme is optional, however there are few good reasons why using a Child Theme is recommended when it comes to advanced customizations. To use Child Theme, you should upload the bundled Child Theme from the package as well, click the "Add New" button and then "Upload" the Child Theme .zip file, [theme-name]-child.zip. After uploaded, please activate the Child Theme or the Parent Theme.
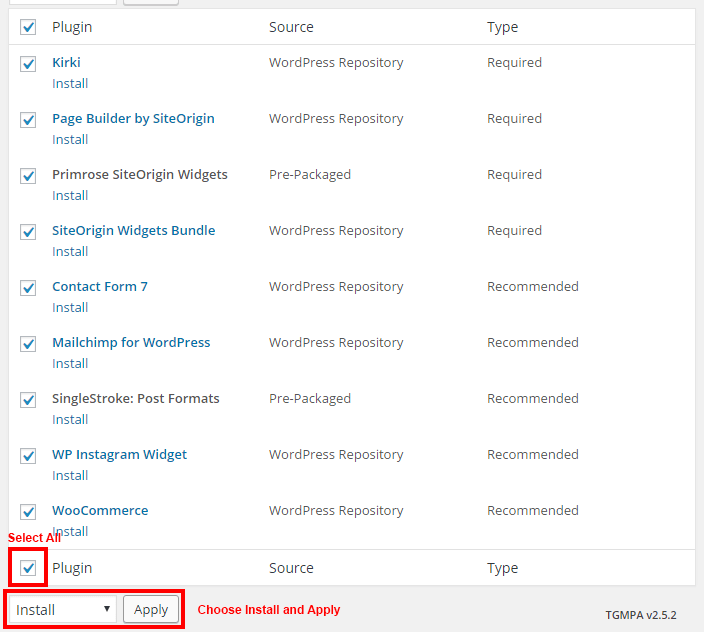
6. Installing and Activating Required Plugins
After activated, you need to install all the required & recommended plugins. It's necessary to install and activate all the plugins, since some of theme's functionality really depends on those plugins. Please navigate to Appearance > Required Plugins. You would see a list of all the required & recommended plugins. Check all the plugins, select "Install" and "Apply".
Screenshot was taken from Primrose, it might look a bit different on other themes, but it works the same way.
It would take a while installing all the plugins, after finished you would be redirected to a success page, click the "Return to Required Plugins Installer" link, and you would be back at the required plugins list page. Check all the plugins, select "Activate", and click "Apply". Done! Your theme would have full functionality now.
7. Demo Data Import (Optional)
Some of our themes are bundled with demo data import feature. This could be really helpful if you want to start your site quickly or you want to have the same looks as our demo site. Learn more about demo data import feature on this article.
8. Customizing the theme
All the theme's settings are available on Appearance > Customize. Browse into each section and try to change or modify the options. You can change layout, colors, or even typography that fits your business / personal branding.
9. Troubleshooting
In case you hit problems when installing and setting up the theme, please create a new support ticket. While creating a new ticket, it's important to include as much information as you have on the issues, like: the page URL where issue appears, the theme version, or your login details. Our support team would get back to you and help you. Cheers!
3. Theme Demo Data Import
Demo data import feature is intended for fresh installation only. Before running demo data import, please make sure you have these conditions:
You haven't created any new posts / pages other than the default ones included on the WordPress fresh installation.
You have installed and activated all the Required Plugins recommended by the theme on theme installation.
If you installed WooCommerce plugin, please ignore the initial Setup Wizard, by clicking "Not right now" button. This might cause duplicate pages when you imported demo data.
Before you import the demo data, it is recommended to turn on the WP_DEBUG mode on wp-config.php file on your WordPress installation directory. It's useful when the improt process hit errors, you need to know the type of the error occured for resolving it. You should turn off this WP_DEBUG mode after you finished with the demo data import.
If you find any error while importing, there are chances that it's because of your hosting configuration. Please read this article to get the quick solution.
One Click Demo Data Import
This feature is only available on some of our themes, because not all of SingleStroke's themes require complex demo data. Themes which are using this feature are:
Primrose
Jack & Rose
The One Click Demo Data Import feature allows you to clone our demo site content into your own site with only ONE CLICK. This could be really helpful if you want to start your site quickly or you want to have the same looks as our demo site. Make sure you have already installed all the required plugins list, otherwise the One Click Demo Data Import menu can't be found. After you installed the plugins, please follow these steps:
Navigate to Appearance > Import Demo Data.
Choose the demo data choice you wish (if available) and then click the "Import Demo Data" button. Yes it's a ONE CLICK!
The process would take a while, please wait and don't close the browser tab. After finished, you can check your home page. Voila!
** Please note that some images might be converted to gray images due to a copyright policy from the owner.
4. Troubleshooting Demo Data Import Errors
There are some cases, the import proces might fail. This is usually caused by your hosting configurations which might conflict with the way WordPress running the import. Luckily, we have a few tips to fix these issues.
Execution time limit
Some servers have short execution time limit by default. In some cases, the import process is aborted due to this time limitation. You can adjust the time limit from your PHP server configuration, or you could use WP Maximum Execution Time Limit Exceeded plugin.
"Failed to import ..."
That means some recommended plugins which is mandatory for the data haven't been installed. That's why we suggested that you install all the required plugins before you import the demo data.
There are chances, that you have installed all the required plugins and still got a long list of "Failed to import ..." errors. In this case, there is a tricky solution:
Find the XML file on the theme package.
Compress the XML file into a .gzip file (or .gz file) using 7zip application on Windows.
Try to re-import using the new .gzip file.
Blank screen while importing
It is usually caused by PHP error. If you have activated the WP_DEBUG mode, and see this error message on your Tools > Import page:
Strict Standards: Redefining already defined constructor for class WXR_Parser_Regex in xxxxx\wp-content\plugins\wordpress-importer\parsers.php on line 408
Strict Standards: Declaration of WP_Import::bump_request_timeout() should be compatible with WP_Importer::bump_request_timeout($val) in xxxxx\wp-content\plugins\wordpress-importer\wordpress-importer.php on line 38
By default, WordPress would use blog posts index as the front page. But you can use other custom static page as the home page. First, you need to create your static page, fill it with content. Or if you have used demo data impor, you could directly go to Settings > Reading.
There would be a "Front page displays" option. Set the value to "A static page", and then set the "Front page" option to your custom static home page. You would also need to set the "Posts page" option to a new custom page. This new custom page will replace the default Blog posts index page.
6. Theme Updates
Updating your theme to the latest version is really important and highly recommended. Each update might contain bug fixes, new additional features that may be available, also new implementation of WordPress new features and plugins.
** By updating a theme, normally you won't lose any data, because they are kept in the database. But it's a good idea to backup your database before updating a theme, just in case.
** All hardcoded changes on your Parent Theme would be gone upon updating. That's why we don't recommend any hardcoded change on the Parent Theme. Please use Child Theme if you want to override template, add hooks, etc.
Manual Theme Update
Manual theme update requires you to re-download the theme package from the marketplace and then re-upload the new version to replace the old one. This method is simple but need a bit of works and attention to details.
1. Download Theme Latest Version
Simply log into your ThemeForest account you used to initially purchase the theme and navigate to your Downloads page and find the theme in the list. Click "Download" button and choose "All Files & Documentation". Extract the package .zip file and found if there is special note text file included. If yes, please read the text file, as we include specific guidelines which needs your attention before updating the theme.
Inside the package, you would also find two .zip files, which are the Parent Theme and the Child Theme. You only need to upload the Parent Theme, as the new version core changes are applied to the Parent Theme only. Whether you are using Child Theme or not, you don't need to re-upload the Child Theme. Otherwise, your hardcode changes on your Child Theme would be gone.
2. How to Re-upload Parent Theme
** If your site is already live and get high traffic, you might want to use WP Maintenance Mode plugin when updating the theme. That way, users won't notice any misbehavior from your website while updating.
Log into your WordPress Dashboard and navigate to Appearance > Themes. Please note, if you are using Child Theme, it's not necessary to update the Child Theme, you only need to update the Parent Theme.
You should activate another theme (e.g. TwentySixteen), as WordPress doesn't allow to delete an active theme.
Delete the Parent Theme, by clicking "View Details" on the Parent Theme, and then find the "Delete" link.
Re-upload the Parent Theme, by using the "Add New" button and then "Upload" the new version .zip file.
Activate the new version theme. Done!
Automatic Theme Update (via Envato Market plugin)
This method is way faster for long run, you would get notification when a new update has been released. But you need to install an additional plugin and do some configuration on it.
Envato Market is one of recommended plugin we have listed on Appearance > Required Plugins. If you have installed and activated the plugin, you should be able to find "Envato Market" menu on your Dashboard. In that page, you should connect your website with Envato API so that every released updates, you would get a notification to update your theme.
There are two kinds of Token key:
Global Token
Single Use Token
We recommend you to use Single Use Token, as we want to keep your website connected to only the theme you are using. This is used when you build the website for your client, and you want the client to have access to only the theme they are using, not other themes you have purchased.
After that, navigate to My Apps menu, scroll down and then click the "Create new token" button.
Choose a name for your token, check these permissions options:
View and search Envato sites
Download your purchased items
Verify purchases you've made
List purchases you've made
Tick the "I have read ..." checkbox and click the button.
Copy the token key, go back to your Envato Market settings page, and paste your token key there.
If you have sucessfully connected the token, a new tab would appear on the Envato Market settings page, titled "Themes". You can do automatic update whenever the update is
7. Setting How Many Blog Posts on The Index Page
You might need to configure how many posts would be displayed on posts index page, when users would need to navigate to the next page after seeing a specific amount of posts. This option would also be very useful if you have custom posts layout, e.g. 3 Columns Grid Layout, or 4 Columns Grid Layout, etc. The configuration is very easy.
Go to Appearance > Reading, and there would be "Blog pages show at most" option, set the number to your liking. Done!
Changing number of posts per page for products, portfolio, or other custom post types
Some of SingleStroke's themes integrates with other custom post types, e.g. Primrose integrates with "Products" post type. In some cases, you would also need to configure how many products you would like to display in the "Shop" page. WordPress doesn't have dedicated option for custom post types. So you would need to install Custom Posts per Page plugin. After installed and activated, go to Settings > Posts Per Page, you would find a list of post types along with the option to set the number of posts per page.
8. Adding "Continue Reading" or "Read More" Link on Blog Posts
"Read more" link is used to cut long content of a blog post when displayed in posts index page (blog home page, category page, or other archive pages). Users would need to click this "read more" link to go to the full version of single post page.
All SIngleStroke's themes are compatible with "read more" tag and you could manually where to cut your content and insert the "read more" link.
Go to your post editor page, in the editor box, there would be an icon like this:
Set your cursor to where you want to cut the content, and then click "Insert Read More tag" icon. You might cut your content after your first paragraph, or second paragraph, or anywhere you see fits. Example of how it's done:
9. [Jack & Rose] Setup the RSVP Ribbon Menu
Unlike the standard navigation which you can customize from Appearance > Menus, the ribbon menu is an unique feature on Jack & Rose, and can only be configured from the Customizer. Navigate to Appearance > Customize > Header, you would find some options to configure the ribbon menu.
"Ribbon target URL" option should be set to your home page URL + your section's target anchor ID. For example, if you want to redirect your ribbon menu to RSVP section on your homepage (http://example.com), you should fill it with http://example.com/#rsvp.
Please note, you need to set the RSVP section's Anchor ID to "rsvp" on the Page Builder, otherwise the scrolling navigation wouldn't work.
10. [Jack & Rose] Hero Slider Section
Hero Slider section is good for the main landing page as it makes the first impression to users. To setup Hero Slider, first, you need to install Attachment plugin (the one we recommend in the "Required Plugins" page).
After installed, please go to your page editor and you would find a new box under the editor box, titled "Hero Slider". You can add new slide, upload your photo / video, and sort them up.
The "Video Poster URL" option would work as the fallback image on mobile devices if you use video slide. It's mandatory if you use video slide.
11. [Jack & Rose] Recommended Image & Video Size
To get the optimum performance, we have some guidelines on your media files size. Each theme has different design, therefore you have to adjust your media files size to the optimum size. Some issues that might occurs if you upload wrong size media files:
Slow performance. Uploading big media files size (e.g. larger than 1MB / image) could cause slow loading performance on your website.
Images blurred. In some elements (e.g. background) you need to upload a "large" size (not too large though), otherwise your images won't look sharp or blurred.
Those issues above are NOT considered as a theme's issue. Uploading the wrong size of media files doesn't mean the theme is "bad designed", or "slow". Please follow these guidelines below:
Blog post featured image: recommended size: 1080px width when in no sidebar layout or 760px width when sidebar is activated.
Grid styled images: depends on the number of columns you set, recommended size: 540px width (half of 1080px, for 2 columns layout).
Recommended video size
If you are using video background for your hero section, you need to convert your videos into 3 formats: mp4, ogv (or ogg), webm. These 3 formats are recommended since some browsers has their own video support preferences. Each format should have same filename. e.g.:
It is also recommended to keep your file sizes at the optimal minimum size, so it's bandwidth friendly. you can try change the frame width/height, lower the bitrate, etc.
12. [Jack & Rose] Background Music
To activate built-in background music feature on Jack & Rose, please navigate to Appearance > Customize > Background Music. You can choose whether to use 3rd party online streaming services like Youtube / Soundcloud, or upload your own mp3 file into the site (takes more bandwidth to your hosting plan).
Using Soundy Background Music plugin
If you want more customizations, please use 3rd party plugin: Soundy Background Music which is free and pretty easy to use.
Scrolling navigation is used on one-page landing page where you clicked a link on the menu, the page would scroll to the particular section. To activate the scrolling navigation, folow these steps:
Edit your landing page and make sure you are in the Page Builder mode. Click Edit (wrench icon) on the row (section) where you want the navigation scroll to.
In the right panel, click on Attributes tab, and find the Anchor ID option. Fill it with a unique sluf-format name. e.g. "events", or "gallery".
Click Done, and Update the page.
Now navigate to Appearances > Menus, where you need to create the link in your menu.
Create a new link using Custom Link type. Fill the URL with your one-page URL and add a hashtag and the Anchor ID from your section in the page. e.g. http://domain.com/#events or http://domain.com/#gallery.
Done!
If you used our demo data import feature, you already have the home page integrated with the scrolling navigation.
14. [Jack & Rose] Setup RSVP form
If you used our demo data import feature, you already have the home page integrated with our default RSVP form. You can start editing from it, add or remove some form fields to what you need.
How to setup the form? We use Contact Form 7 to manage our RSVP form module. Please read the plugin documentation to learn more about how to setup the form.
15. Optimizing Loading Performance
All SingleStroke's themes are built using the best practice to ensure you have best loading performance on your website. But there are many factors why your website runs slow and most of them are caused by non-theme factors, like:
Your hosting specifications. A slow hosting or standard shared hosting usually runs slower than a dedicated server / VPS server. If your website traffic is growing high, we suggest you to migrate to better server.
Your huge media files. It's a common sense that loading huge images sizes would take more bandwidth, which means more loading time. We suggest you to read the "recommended image / video size" article on each theme's article directory.
Other plugins. There are chances you are using other plugins other than what we recommend and they might get you errors or slowing down your website performance.
Non-optimized. By default WordPress needs some configurations to really make it runs faster. Those include the use of caching modules, minifying resource files, and other optimizations.
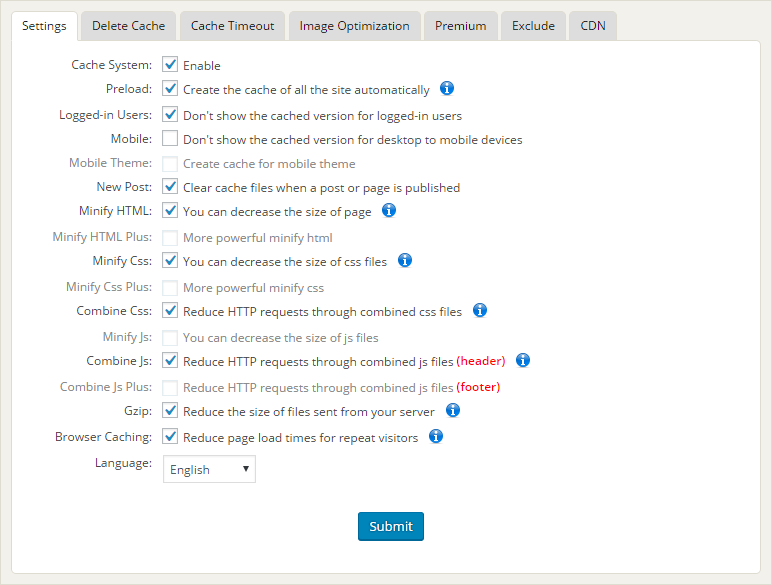
There are some plugins out there that work really well for WordPress optimizations. We have been using these plugins on our demo site, and it works well with our themes (with correct configurations). Plugins we recommend are:
There is FREE and PRO version of the plugin, the FREE plugin works well and is enough for standard optimizations. If you have the FREE version installed, you can copy these configurations on your own setting page:
Autoptimize
You should pay attention to Autoptimize configurations. Wrong configurations could lead to site errors. We suggest you to only enable the safe basic options unless you know what you are doing exactly. The basic options are:
Optimize HTML Code?
Optimize JavaScript Code?
Optimize CSS Code?
Save aggregated script/css as static files?
16. Multi-Language Website
Multi-language feature allows you to more than one variation of all your pages / posts. Users can switch between languages, and your content would automatically switch to the chosen language version. Some of our themes that are compatible with multi-language feature:
Primrose
WPML
WPML is the most popular multi-language plugin for WordPress. The plugin is premium and NOT included in our theme package. Please purchase the plugin and install it on your website.
You should also install the WPML addon: WPML String Translation plugin which would help you add multi language version of each theme's translatable text.
For further documentation about how to use WPML, please read their documentation which is available here.
17. Translating Into Other Languages
All SingleStroke's themes are transatable. If you need to translate all text in the theme into non-English language, there are two ways to do it:
Translate using 3rd party plugin
This method is way easier. First, you need to install Loco Translate plugin, which is a free plugin. After installed and activated, the plugin will automatically detects all translatable texts in the theme. Go to the new Loco Translate menu from your Dashboard, and find the Theme you want to translate. Click the "+ New Language" link, select the new language, and start tranlsating the texts in the list.
Browse to the theme's directory and find the .pot file inside the languages directory, open on POEdit
Click "Create new translation", and fill the needed information, like the target language, author name, etc. And then click "Save".
When saving, you need to name your file with the ISO format code. You can take a look of the code list here. ** Use underscore (_) instead of dash (-).
Translate all the texts available on the list
When finished, click "Save" and then upload the .po file to your WordPress installation directoy (via FTP). Upload it to /wp-content/languages directory. You might need to create the languages directory, if it still doesn't exist.