Before you get started with our themes, please note that all SingleStroke's themes ONLY work for WordPress.org (self-hosted WordPress) and can't be used for WordPress.com installation. If you are new to WordPress.org, please follow these few steps to setup WordPress on your hosting.
1. Get a good WordPress hosting
WordPress.org application needs to be installed on your own hosting. If you don't have any host yet, you can take a look at our Recommended WordPress Hosting list, which has high quality hosting plan to run WordPress.
** We strongly suggest you to use one of our recommended hosting, as some other hostings have issues and aren't completely compatible to run the lastest version of WordPress.
2. Install WordPress on your hosting
After activated your hosting, the easiest way to install WordPress is using the "1 Click Install" feature that might be available on the hosting features. But if you want to take control of the process by yourself, you can use this 5 Minute Install which has detailed instructions to setup your WordPress. We recommend you to do it manually as it's good to make you more familiar with the platform itself.
3. Enter your WordPress site
After installed your fresh WordPress site, you could log into the admin pages, by going to your site URL and add "wp-admin" next to the site URL, e.g. http://domain.com/wp-admin. Use the username and password you just created, and you would be redirected to the Dashboard page.
4. Download the theme package
Simply log into your ThemeForest account you used to initially purchase the theme and navigate to your Downloads page and find the theme in the list. Click "Download" button and choose "All Files & Documentation". Extract the package .zip file and you would find two .zip files: the Parent Theme and Child Theme. The filenames should be in
[theme-name].zip and [theme-name]-child.zip
5. Upload the theme into WordPress
First, log into your new WordPress installation and go to Appearance > Themes, and click "Add New" button on the top part of the page. After that, click "Upload Theme" button and upload the Parent Theme .zip file, [theme-name].zip.
Child Theme is optional, however there are few good reasons why using a Child Theme is recommended when it comes to advanced customizations. To use Child Theme, you should upload the bundled Child Theme from the package as well, click the "Add New" button and then "Upload" the Child Theme .zip file, [theme-name]-child.zip. After uploaded, please activate the Child Theme or the Parent Theme.
6. Installing and Activating Required Plugins
After activated, you need to install all the required & recommended plugins. It's necessary to install and activate all the plugins, since some of theme's functionality really depends on those plugins. Please navigate to Appearance > Required Plugins. You would see a list of all the required & recommended plugins. Check all the plugins, select "Install" and "Apply".
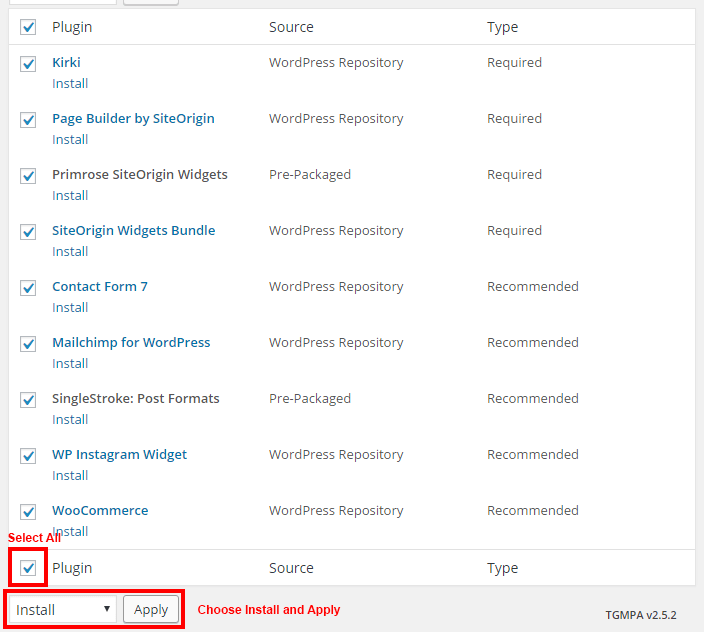
It would take a while installing all the plugins, after finished you would be redirected to a success page, click the "Return to Required Plugins Installer" link, and you would be back at the required plugins list page. Check all the plugins, select "Activate", and click "Apply". Done! Your theme would have full functionality now.
7. Demo Data Import (Optional)
Some of our themes are bundled with demo data import feature. This could be really helpful if you want to start your site quickly or you want to have the same looks as our demo site. Learn more about demo data import feature on this article.
8. Customizing the theme
All the theme's settings are available on Appearance > Customize. Browse into each section and try to change or modify the options. You can change layout, colors, or even typography that fits your business / personal branding.
9. Troubleshooting
In case you hit problems when installing and setting up the theme, please create a new support ticket. While creating a new ticket, it's important to include as much information as you have on the issues, like: the page URL where issue appears, the theme version, or your login details. Our support team would get back to you and help you. Cheers!